Guide and Support

How can we help?

The Poker Geek Pro guide, with real screens from the app. Can’t find what you need? Email and we’ll get you sorted.

Getting started

What Poker Geek Pro is, and where everything lives.

One app, four tools

Poker Geek Pro bundles everything a live player needs: an odds calculator with real equity for every supported game, a complete bankroll tracker with live session tracking, saved hand histories with Geek Coach AI study advice, and tournament chop calculators.

Switch between sections with the grid button in the top-right corner. Each section remembers where you were, so you can bounce between a running session and the calculator without losing your place.

Bankroll overview
A saved hand with equities
Profit charts

Every game you actually play

Hold’em, Omaha, Omaha 5/6/7 (Big O), Hi-Lo splits, and double-board bomb pots — the same real odds everywhere. Bomb pots show odds for each board, and Hi-Lo games show high and low next to the combined number.

Double-board bomb pot hand with per-board equities
Hi-Lo split hand with Hi and Lo equities
Big O (5-card Omaha Hi-Lo) hand

Free, Casual, and Crusher

The core toolkit is free with ads. Casual removes ads and unlocks a faster Monte Carlo engine, cloud sync, restore, and export. Crusher adds the AI features — the Geek Coach AI, the Geek Camera, and receipt scanning — which share one monthly pool of AI credits.

Subscriptions are purchased inside the app and billed by the App Store or Google Play; current pricing is always on the in-app Choose Your Plan screen.

Geek Coach AI — a Crusher feature
Next-street equity detail

Finding your way around

A couple of taps takes you anywhere in the app.

Switch between the four tools

The grid button in the top-right corner opens a menu of all four tools — each with its live numbers (your bankroll, your saved-hand count). Each section remembers exactly where you were.

  1. Tap the grid button in the top-right corner of any section.
  2. Pick a section — the checkmark shows where you are now.
The grid button in the top-right corner of the Bankroll overview
The menu of all four tools, each with live numbers

Move between a section’s views

In sections with multiple screens — like Bankroll’s Overview, Sessions, Locations, Statistics, Charts, Forecast, and Trends — the title in the top-left corner is also a menu. Tap it to jump anywhere in the section.

You can also swipe left and right to flick through a section’s views — it’s on by default, and the “Swipe to navigate” switch in Settings turns it off if you’d rather tap.

  1. Tap the section title (for example “Overview ⌄”).
  2. Choose a view — descriptions under each name say what lives there.
The Select view menu listing every bankroll screen
The title menu is always in the top-left corner

On tablets and foldables

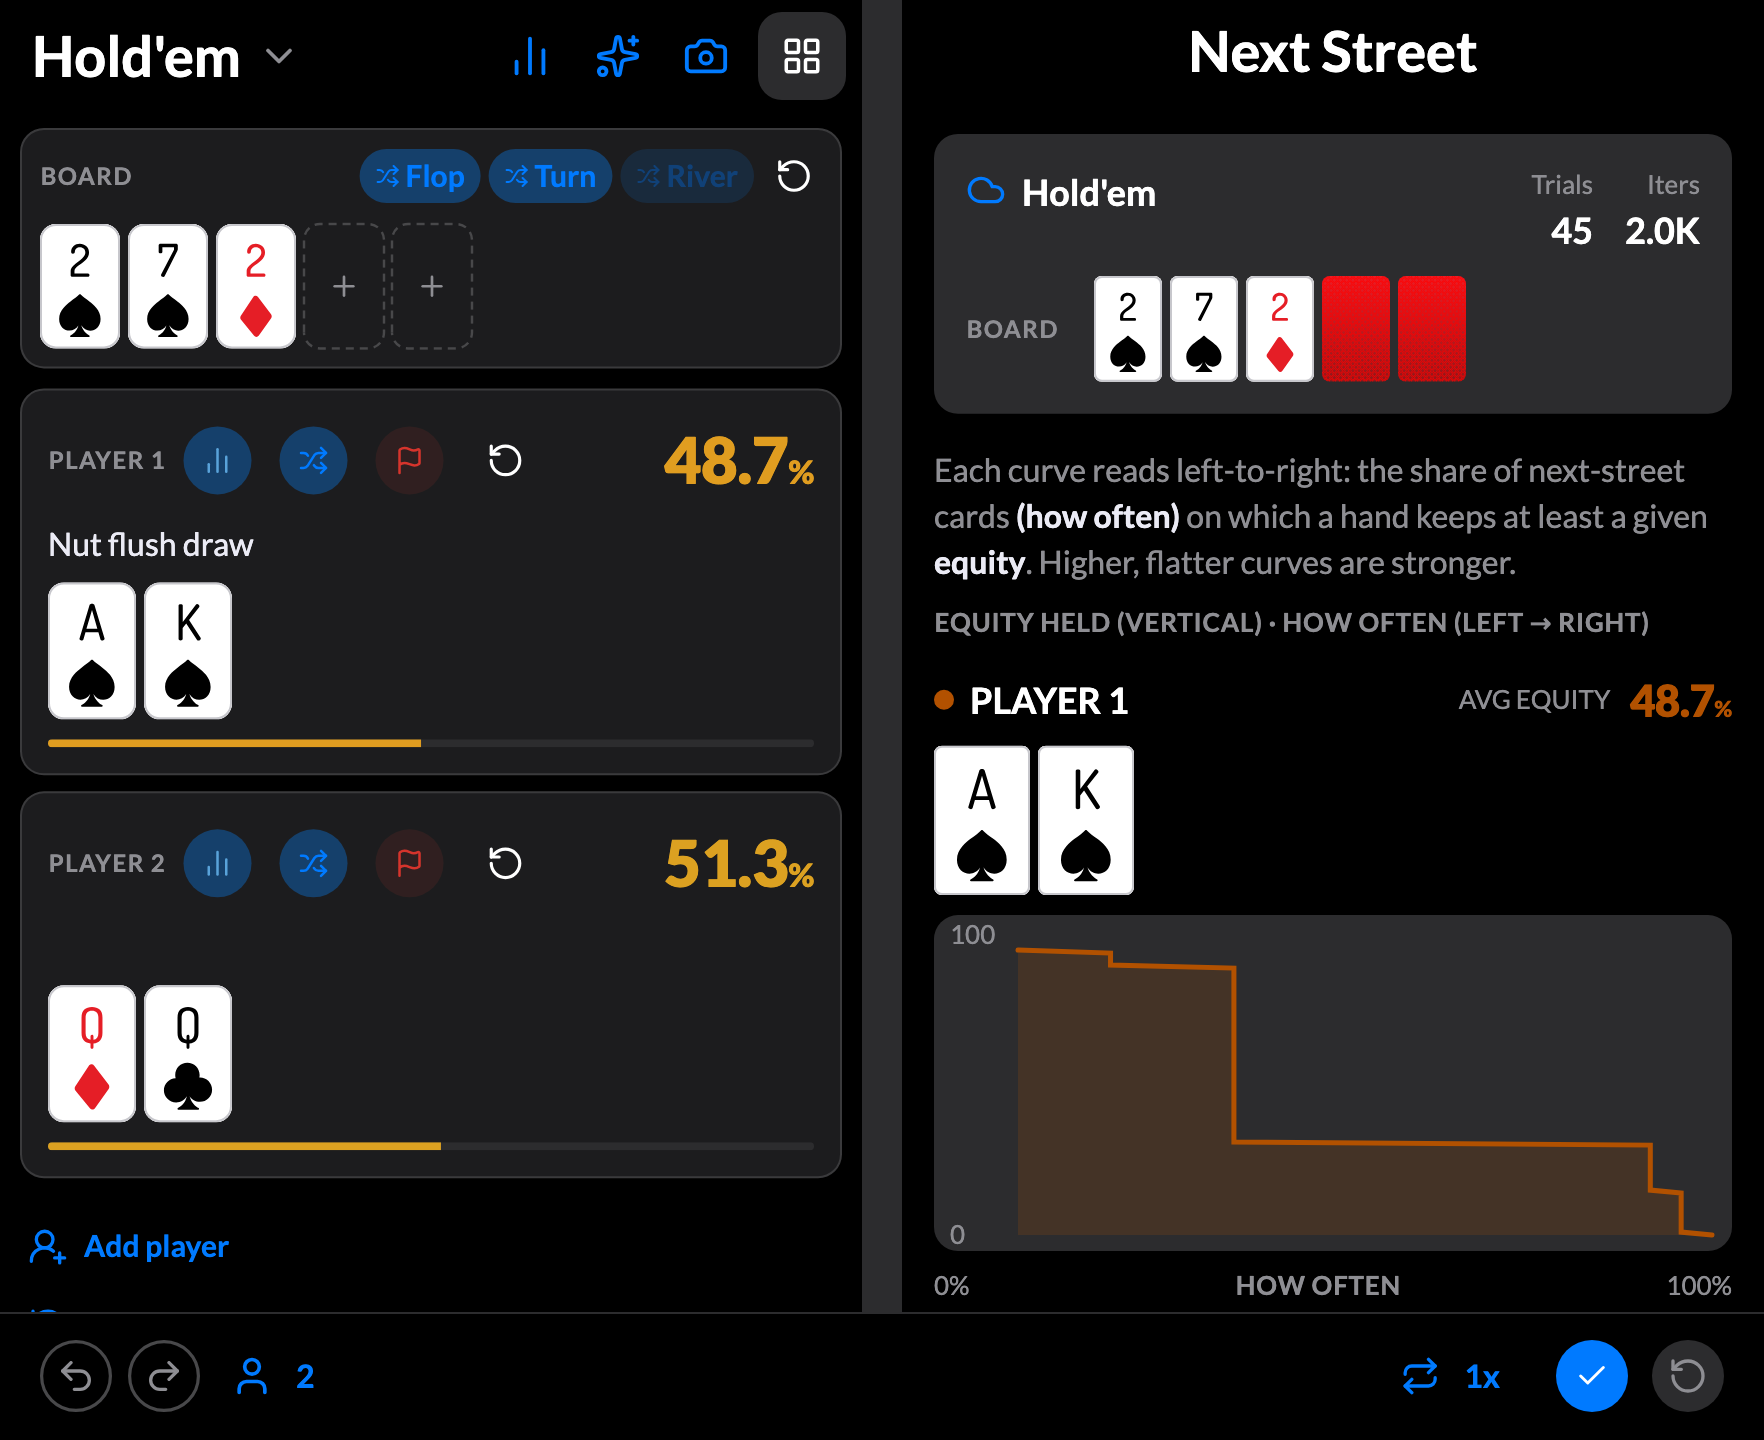
On a tablet — or a book-style foldable opened flat — the calculator uses the room: your hands and board on the left, with the Next Street equity graph alongside on the right, always live. Close the foldable and the app snaps back to the one-column phone view on the cover screen.

Phones keep the one-column view in portrait, where everything is reachable with one thumb.

The calculator on a book foldable opened flat: the board and both players’ hands with their live equities on the left, and the Next Street equity graph alongside on the right

Pick your game

In the calculator, tap the game name in the top-left corner to see every game, grouped by family: Hold’em, Omaha with 4 to 7 cards, the Hi-Lo split games, and the double-board bomb pots. Games you’ve used recently float to the top.

Each game keeps its own table, so switching to Omaha and back to Hold’em restores exactly the hand you left.

  1. Tap the game name in the top-left of the calculator (for example “Hold’em ⌄”).
  2. Pick a game — the checkmark shows the one you’re on.
The game menu, grouped by family
Omaha loaded: four-card hands, same live equity math

The odds calculator

Real equity, updated live as you build the hand.

Build a hand and watch the math update

Tap any card back or empty slot to deal a card — choose a suit, then a rank, or let “Random” deal for you. The odds update instantly with every change.

The board deals by street too — the Flop, Turn, and River shuffle buttons deal random cards one street at a time — and the Dead row takes known-dead cards out of the deck so the math accounts for them.

Use the undo and redo arrows to step through your changes; every edit is kept on your device so you can pick up where you left off. “Fold” removes a player from the hand without deleting their cards, and “Reset” clears the table for the next spot.

The calculator mid-hand: real equities updating as the hand is built
The same flow in Omaha, with hand-strength captions under each player

Fix a jumbled table — just drag a card

Cards landed in the wrong spots? Press and hold any card to pick it up, then drop it where it belongs. Drop it on an empty slot to move it there, or on another card to swap the two — across your hands, the board, and the dead cards.

It’s the quickest fix after a table scan reads every card right but puts a couple in the wrong hands: nudge them into place with your thumb, and the odds update the moment they land — no clearing cards, no retyping.

  1. Press and hold a card until it lifts under your finger.
  2. Drag it onto an empty slot to move it there, or onto another card to swap the two.
  3. Lift your finger to drop it — the odds update right away.
Mid-drag: a card lifted under the finger to move it, its original slot faded
After the swap: the two hands corrected to pocket aces and pocket kings

Run it two, three, or four times

All in? Set the calculator to run the board two, three, or four times — from the bottom toolbar, or right inside Hand Details — and it shows your chance of winning at least one run, half of them, or all of them.

  1. Tap a player’s odds number to open Hand Details.
  2. Set “Run it multiple times” to 2x, 3x, or 4x.
  3. Read the scoop odds — the chance of taking half the pot or the whole thing.
Hand Details with the run-it-twice odds
The bottom toolbar with the run-it button

Go deeper on any hand

Tap a player’s odds number to open Hand Details. Everything is right there: their best five cards right now, and how often the hand wins, ties, or scoops. In Hi-Lo games you’ll also see separate high and low odds next to the combined number.

The next-street equity graphs show how often a hand keeps at least a given equity as the next card falls — the fastest way to see the difference between a robust made hand and a fragile one.

Hand Details: the odds, scoop chances, and best five cards
The equity graphs: how two hands hold up as the next card falls

Estimate against a range

Don’t know an opponent’s exact cards? Give them a range instead, and the calculator runs the odds against every hand they could hold — much closer to how real decisions work.

Hold’em ranges use the classic 13×13 grid. Once built, the range sits right on the player’s card — tap it any time to adjust.

  1. Tap a player’s hand, then tap the “Range” button.
  2. Drag the Top Hands slider to pick the strongest X% of hands — or tap grid squares one by one.
  3. Close the editor. The player now shows their range, and the odds count every hand in it.
The 13×13 Hold’em range grid with a top-44% selection built
The player row carrying the built range — with its real equity vs aces

Ranges in Omaha games

Omaha hands have four or more cards, so instead of a grid you build the range from plain-English pieces: a base (like “Broadway Rundowns” or “AAxx”), optional side cards, and suits. The Range Builder walks you through it in three quick steps.

The finished range shows on the player in plain English, with the real odds against it — in this example, Broadway rundowns are 65% against aces on a J-T-3 board.

  1. In an Omaha game, tap a player’s hand, then tap the “Range” button.
  2. Tap “Edit in Range Builder” and pick a base — for example “Broadway Rundowns”.
  3. Add side-card or suit preferences if you like, then finish. The odds now count every hand in the range.
The Range Builder: pick a base, side cards, and suits in three steps
A Broadway Rundowns range on the player — truly 65% against aces here

Tracking your bankroll

From sitting down at the table to understanding your long-term results.

Track a session live at the table

The live tracker is built for one-handed use next to a stack of chips. Start it when you sit down and everything lands in your bankroll the moment you cash out.

  1. In Bankroll, tap + and choose “Start live poker session”.
  2. Pick your game, stakes, and venue from your saved presets, enter your buy-in, and the timer starts.
  3. During play, add rebuys, stack updates, and notes — or log a big hand straight into the calculator.
  4. When you rack up, tap “Save and End Session”, adjust the cash-out or times if needed, and save.
A running live session with timer and activity log
The session time picker for adjusting start and end times

Log a finished session afterward

Forgot to track live, or prefer to log at home? The session form takes cash games and tournaments, with saved game and venue presets so a typical entry takes seconds. Start and end times default sensibly — the end time to right now — and everything is editable before you save.

New cash session entry form
New tournament session entry form

Bring your history from another app

Switching from another tracker? Import your whole history in a couple of taps — importing is always free. Poker Geek reads CSV exports from Poker Bankroll Tracker, Poker Analytics 6, Pokerbase, Left Pocket, and Bink, and figures out which app your file came from automatically — you don’t need to know anything about file formats.

You review everything before it lands: the import screen shows what it found and flags duplicates against sessions you already have, so it only adds what you confirm.

  1. On Bankroll, tap the “…” menu and choose “Import Sessions”.
  2. Tap “Browse files” and pick the CSV your other app exported.
  3. On Review Import, check what was read, then tap “Import” to add the records to your bankroll.
The Import Sessions screen: a Choose a file to import panel with Browse files, and the supported apps — Poker Bankroll Tracker, Poker Analytics 6, Pokerbase, Left Pocket, and Bink
Review Import: a Poker Bankroll Tracker export detected automatically, with sessions, venues, games, and stakes to bring in and a preview of the first few sessions

Understand your results

The Overview shows your bankroll curve and recent sessions at a glance. Dig deeper with profit charts by weekday, month, and session length, and a trend explorer for any metric over any window.

The Forecast projects your coming months from your real results — with a likely range and a risk-of-ruin estimate, so you know whether your bankroll truly supports your stakes.

The Overview: bankroll curve, hourly, win rate, recent activity
Profit charts by weekday, month, and session length
The Forecast: your projected bankroll and risk of ruin

Statistics: the complete breakdown

Statistics puts the numbers you check most right on top — net result, hourly win rate with its confidence range, win rate, average per session, and tournament ROI and cash-rate. The Breakdowns tab holds the full ledger: money in and out, session counts, and costs, each split cash versus tournament on clean one-line rows.

Want to go deeper? The stats detail adds period-versus-period comparison, per-game and per-stakes tables, and a plain-English guide to what every metric means.

Statistics sliced by game, stakes, and venue
Stats detail: money, sessions, ROI and ITM, cash vs tourney

Explore trends over any window

Trends leads with the answer: your net result for the window you’re looking at, right on top, with one big chart under it. Tap the card under the chart to change what it shows — every choice is in plain English, like “Net $ over time” or “Big blinds per hour”. Your total, cash, and tournament results each get their own line: the Total, Cash, and Tourney buttons under the chart turn each line on and off. Press and hold the chart to trace the numbers at any point.

Trends follow your filters, so “this year at $2/$5 at my main room” is a question the chart can answer. When a filter has a comparable previous period, a comparison card shows how your win rate, $/session, and volume moved against it.

Trends charting a stat over time
Trends lives in the title menu, next to Charts and Forecast

Filter, slice, and export

The filter button slices your history by date, session type, game, stakes, venue, expense type, and result — and everything follows: the totals, the charts, and the list.

Exporting from the “…” menu always exports your complete history — every session, tournament, and expense — even while filters are on. Your backup is always complete.

The sessions list with month groups and net summary
Charts follow the same filter as the list

Expenses and your starting balance

Not everything is a session. Log expenses — travel, meals, dealer tips — and they count against your bankroll without mixing into your play stats. Set your starting balance from the “…” menu so the chart shows your real bankroll, not just your winnings.

Everything in the list is tappable: tap an expense to edit or delete it, and tap a session to see its full details.

Recent activity with sessions and a standalone expense
Expenses ride along in the sessions list, flagged in red

Made a mistake? Undo and edit everything

In a live session, swipe an entry to delete it — an Undo button appears, so an accidental swipe never costs you anything. After a session is saved, everything stays editable: times, amounts, game, venue, notes. Nothing is locked in.

The calculator has the same safety net: undo and redo arrows step back and forward through every card change, so experimenting never loses the original hand.

The live session log — swipe an entry to remove it, with Undo
A saved session’s detail with its editable session log

Venues, rake, and your data

Venues remember their details — including location, so when you open the app at a casino you’ve saved, it selects that venue for you automatically. Clubs that charge by the hour can carry a default timed rake that’s applied automatically, and you can adjust it on any single session.

Importing history from another tracker is free; exporting your data as CSV is included with Casual.

Venues with per-casino results
Saved venues become one-tap presets on the session form

Timed rake, made painless

Playing somewhere that charges by the hour? Set the venue’s timed rake once, and every session there accounts for it automatically — your net and hourly always show what the game really costs.

  1. Open the venue and set its timed rake (for example $14 per hour).
  2. Sessions at that venue apply it automatically — you’ll see it as an auto time-collection entry in the session log.
  3. For a one-off special, change the amount on that session — or switch that session to “No rake”.
The session form with venue rake settings
The session log where auto time-collection entries appear

Tournaments, bounties, and deep runs

Tournament entries track everything a cash session can’t: buy-in, fee, bounty, re-entries and add-ons, field size, your finish, and whether you cashed. Your ROI and cash-rate stats stay separate from your cash-game results.

A tournament entry with buy-in, fee, bounty, and re-entries
A finished tournament’s detail with field, finish, and payout

Presets do the typing for you

The session form pre-fills from your last session, and your regular games and rooms become one-tap presets. Saved venue and game presets show at the top of the form with a checkmark; anything new offers “Save as preset” so next time is instant.

Set up presets for your two or three regular games once, and a typical session entry takes about five seconds.

Saved venue and game presets at the top of the session form
Cash-game presets: stakes and venue matched with a checkmark

Receipt tracking

Keep every slip, rebuy, and expense with the entry it belongs to — read for you, or added by hand.

Scan a slip and let the app read it

There are two ways in. To start from a photo, open the “+” menu on Bankroll and tap “Scan a receipt” — it creates an expense or tournament draft from what it reads. To read a receipt into an entry you’re already editing, tap “Scan a receipt” on the form.

Either way, you pick “Take a photo” to use the camera or “Choose from library” for one you already have. While it works, the “Reading your receipt…” screen shows the vendor, date, and amount being pulled off the photo. Then the Review Receipt screen lays out everything it read — the kind of receipt, the venue and date, the amounts — for you to confirm before you save.

Reading a receipt for you is part of Crusher. You can always add a receipt photo by hand on any plan (see below).

  1. On Bankroll, tap “+” and then “Scan a receipt” — or open an entry and tap “Scan a receipt”.
  2. Choose “Take a photo” or “Choose from library”.
  3. Wait for “Reading your receipt…” to finish, then check the fields on the Review Receipt screen.
  4. A field it isn’t sure about is flagged “Check this” — glance at it, then tap “Save”. Not what you photographed? Tap “Retake receipt photo” to read a fresh shot.
The “Reading your receipt…” screen pulling the vendor, date, and amount off a photo
The Review Receipt screen: the receipt read as a tournament slip, with venue, date, buy-in, and fee laid out to confirm
The captured receipt shown inline on the review screen, with “Retake receipt photo” beneath it

Add a photo yourself — one, or several

Prefer to skip the read, or already have the picture? Tap “Attach receipt” on any entry to add a photo without scanning — it goes straight onto the entry, no Crusher needed.

A single entry can carry several receipts, which is exactly what a rebuy tournament or a refunded buy-in needs. Each one gets its own “Replace” and delete controls, and “Attach another receipt” adds the next. It works on expenses, on wins and losses, and on your sessions.

  1. Open an entry — an expense, a session, or a wins/losses record.
  2. Tap “Attach receipt” to add a photo, or “Scan a receipt” to read one automatically.
  3. Need more than one? Tap “Attach another receipt” for each additional slip.
An expense carrying three receipts, each with Replace and delete, plus “Attach another receipt — no scan”
The Add Wins/Losses form with “Scan a receipt” above the no-scan “Attach receipt” button

Every receipt ties to your venue

A scanned receipt binds to the room it came from. If the venue it reads matches one you’ve saved, it’s selected for you automatically; if it’s new, the “Venue” row lets you pick a saved room or add one on the spot. From then on the entry, its receipt, and your per-venue results all line up.

Your saved venues live in Locations, where each room keeps its own details and results — so a receipt from “Aria Poker Room” lands under the same venue as the sessions you played there.

The Review Receipt screen with the Venue row bound to the saved “Aria Poker Room”
The Locations screen listing saved venues with their per-room results

Find a receipt again later, and skip the doubles

Every receipt stays with its entry. Open a session or expense and its receipt is right there — tap “Show receipt” to open the photo inline, with no detour to another screen.

And if you go to save one you’ve already logged, Poker Geek notices: a “This looks like a duplicate” note shows the matching entry — and the receipt already on it — so you can skip the double or add it anyway if you really did pay twice.

  1. Open an entry that has a receipt and tap “Show receipt” to view it inline.
  2. Scanning a slip that matches something you already have? Read the duplicate note and tap “Don’t add”, or “Add anyway” if it’s a genuine second payment.
A saved tournament session with a “Show receipt” row at the bottom
The “This looks like a duplicate” note showing the matching entry and the receipt already on it

Keep them all — export and back up

When it’s time to file, tap the “…” button and choose “Export receipts”. Poker Geek bundles every receipt photo into a single zip, ready to share or save. Export is part of your Bankroll Export — the same data-portability feature as the CSV export — and it’s included with Casual and Crusher.

Your receipts also ride along with the rest of your bankroll: cloud backup and restoring to a new phone are included with Casual and Crusher, so the photos come back with your sessions when you sign in on a new device.

  1. Tap the “…” button on Bankroll, then “Export receipts”.
  2. Share or save the zip when it tells you your receipts are ready.
The Export receipts sheet: every receipt zipped up and ready to share
A receipt opened inline on an expense — the kind of record the export gathers up

Filtering your bankroll

One filter that follows you across Sessions, Statistics, Charts, and Trends.

Filter across your whole bankroll

Tap the funnel to open the filter. Whatever you pick follows you everywhere — the sessions list, your Statistics, the Charts, and Trends all reflect the same filter, and a dot on the funnel reminds you a filter is on.

Every section is a plain-language accordion: tap a section like “Session type” or “Receipt” to open it, tap the options you want, and tap “Reset” to clear everything at once.

  1. On the sessions list, tap the funnel.
  2. Tap a section to open it, then tap the options you want to keep.
  3. The button at the bottom shows how many entries match — tap it to apply.
The filter with every section listed and Session type and Receipt engaged
Session type open on cash games, tournaments, and lottery, with the receipt section engaged

Slice by record kind, receipts, and expenses

The “Session type” section covers every kind of record together — Cash games, Tournaments, and the gambling entries you log with “Add wins/losses” (Lottery, Casino, and more). “Receipt” narrows to entries that have a receipt or don’t, and “Expense type” filters your costs by category — meals, travel, lodging, and the rest.

Mix them freely: “this year’s tournaments with a receipt” is a filter the whole app can answer at once.

The Session type section listing cash games, tournaments, lottery, and casino
The Receipt section engaged on entries that have a receipt

Hand history and AI

Save the hands that matter, then study them properly.

Save and revisit your hands

Any spot you build in the calculator can be saved to Hand History with its real odds attached. Reopen it any time to run it back, change cards, or play out the streets.

Search and filters keep big collections manageable — filter by game, players, or board, and sort however you like.

A saved Hold'em hand
A saved Omaha hand with equities
A double-board Ultimate Hi/Lo hand

Run a saved hand back in the calculator

Every saved hand has an “Open in calculator” button. One tap rebuilds the exact spot — cards, board, players — so you can deal different turns and rivers, add a player, or watch the odds shift when one card changes. The saved hand stays untouched while you experiment.

  1. Open a hand in Hand History.
  2. Tap “Open in calculator”.
  3. Change anything — the original stays saved exactly as it was.
A saved hand with its Open in calculator button
The spot rebuilt in the calculator, live math running

Ask the Geek Coach AI about a saved hand

The Geek Coach AI writes a study plan based on the hand’s real odds — from both a GTO and an exploitative point of view — and you can ask follow-up questions about that exact hand and board.

  1. Open any saved hand in Hand History.
  2. Tap “Ask the Geek Coach AI” and pick the Exploit or GTO framing.
  3. Ask follow-up questions in the thread — they stay tied to this hand.
  4. The Geek Coach AI is part of the Crusher plan. Every month includes up to 300 AI credits — fresh analyses and follow-up questions combined — and the count starts fresh each month. The Geek Coach AI, Geek Camera scans, and receipt scanning all draw from one shared monthly AI allowance. Re-reading an answer you already generated never counts against you. The advice is a study aid built on your real numbers — never invented ones.
Geek Coach AI: a recommended action and sizing, based on the hand’s real odds
A saved hand with the Ask the Geek Coach AI button

Scan the whole table in one photo (Crusher)

The quickest way to load a real hand: take one photo of the whole table. A single snapshot reads the board and every hand at once — review what it found, fix anything, and tap Apply. Already have a picture? “Choose a photo” reads it the same way.

The Geek Camera works with all the games the calculator supports and needs an internet connection. Geek Camera scans, the Geek Coach AI, and receipt scanning all draw from the same shared pool of AI credits, which refreshes monthly.

  1. In the calculator, tap the camera button.
  2. Choose “Photograph the table” — or “Choose a photo” for a picture you already took.
  3. Take the shot with the whole table in frame.
  4. Review what was read, fix anything, and tap Apply.
The camera chooser: Photograph the table and Choose a photo under One photo, Live camera under Multiple photos
The Table scan review: the board and three hands read from one photo, with Retake Table Photo and Apply

Capture hands live, hands-free (Crusher)

Prefer to go hand by hand? “Live camera” recognizes hands as you point the camera at them — no tapping at the table. A little buzz tells you a hand was read; keep moving until you have them all, then review and apply.

Live capture works with all the games the calculator supports, needs an internet connection, and draws from the same monthly AI allowance as the Geek Coach AI and receipt scanning — Crusher includes around 300 AI credits every month.

  1. In the calculator, tap the camera button and choose “Live camera”.
  2. Point the camera at each hand — a buzz means it was read.
  3. When you have them all, review the hands it found and tap Apply.
The Geek Camera review after a live session: the board and four hands assigned, ready to Apply
Live camera lives in the same camera chooser, under Multiple photos

Chop calculators

Fair final-table deals, settled in seconds.

Settle a final-table deal

Each deal method gets its own screen — ICM (the standard fair deal), chip chop, reserve, and an even split. The method name sits at the top of the screen: tap it to pick a different method, or swipe left and right to flip between them. Each player’s share is the first thing on the screen, and it updates the moment you change anything.

You only enter the table once — all four calculators share the same stacks and payouts, so switching methods never asks you to retype anything. Every number is tap-to-type or nudged with the − and + buttons, and tapping Add player adds its payout place automatically.

  1. Open Chop Calculators and tap the method name at the top to pick the deal the table wants — ICM is the standard.
  2. Enter each player’s chip stack — tap a number to type it, or nudge it with − and +.
  3. Check the payouts (one place per player) and read each player’s share at the top.
  4. Because the math is on your phone and visible to everyone, the whole table can see the deal is fair — no spreadsheet, no arguing.
The ICM deal screen — each player’s share up top, editable stacks and payouts below
The same table under chip chop — tap the method name or swipe to switch

Pick the right method

Tap the method name at the top of any chop screen to see all four choices, each with a one-line explanation. ICM is the standard — it pays each stack its fair share based on how often it would finish 1st, 2nd, or 3rd. Chip chop is the simple alternative: it splits the pool in direct proportion to chips, which favors the big stack.

Reserve locks in last-place money for everyone first, then chip-chops the rest — a good middle ground when the short stacks want a guarantee. The even split divides the pool equally, and it has a save option: hold back an equal amount for everyone now, and keep playing for what’s left.

The Select method chooser — all four deal methods with one-line explanations
The even split’s save option — an equal amount held back, the rest still in play

Double-check the deal

Every method screen carries a Compare methods card — tap Show and it lays out what ICM, chip chop, reserve, and the even split each pay every player, side by side. The table sees exactly how much the choice of method moves the money before anyone agrees to anything.

Finish odds shows each player’s chance of finishing 1st, 2nd, or 3rd from the current stacks — the numbers behind the ICM deal, ready for the moment someone asks why their share is what it is.

Compare methods expanded — every method’s payout for every player, side by side
Finish odds — each player’s chance of finishing 1st, 2nd, or 3rd

Personalization

Make the app read the way you think.

Decks, colors, and themes

Choose a classic two-color deck or a four-color deck that reads faster at a glance, pick your card-back color, and turn on the colorblind-friendly colors if those suit your eyes better. The whole app follows your phone’s light or dark mode.

You can also choose how many decimal places the odds show — from clean whole percentages to two decimals for the sicko in you.

Card deck settings in light mode
Card deck settings in dark mode

Your data

Backed up, synced, and private.

Backup, sync, and moving phones

Every change is saved on your phone automatically, and your data is backed up to the cloud. Syncing across devices and restoring to a new phone are included with Casual and Crusher.

  1. Install Poker Geek Pro on the new phone.
  2. Sign in with the same account.
  3. Your history restores automatically — nothing else to do.
  4. Your bankroll, sessions, and hand history are never deleted by the app. Peer comparisons only ever use anonymous, combined stats — never your identity.
  5. Importing the same file twice is safe — the app spots sessions it already has and only adds what’s new.
Your session history, restored and grouped by month
Saved hands restore too — equities and all

Troubleshooting

Quick fixes, and how to reach a human.

“Use current location” doesn’t find my casino

Make sure the app has Location permission: Settings → Poker Geek Pro → Location. Venues you save with GPS are matched automatically the next time you’re within range — venues without saved coordinates match after your first GPS visit.

The venues screen
The session form’s venue section, where the match lands

Something else? Found a bug?

Email contact@pokergeeksoftware.com and it goes straight to the people who build the app. Feature requests are how the roadmap gets made — we read everything.